After a slightly heavier topic, I thought I would lighten the mood with a few beauty tips, tricks and secrets from the retired Esthetician (please note: these are things I love and work for me, you might hate them :) ).
I happen to have quite the appetite for all things Skin, beauty & makeup, the problem is that makeup and skin don't ALWAYS go together. Over the years the industry has come miles in creating makeup that won't do a NUMBER ON YOUR SKIN! Being born an albino (not really), I have VERY SENSITIVE skin, sensitive to sun, makeup, moisturizers, cleansers, air, wind and I melt in the rain (again, not really). Well when I went to school to be an Esthetician in 2001 I was fortunate to better learn the types of products that work for my skin and ones that are better in general.
Here is a little sampling of my FAVORITES, and since I have been broke at times in my life there are items at very low cost and easy accessibility. (I have not been compensated by any of these companies to promote their products, but maybe they should be)
Shall we start from the base level and work our way up, yes we shall!
Beginning with Cleansers:


On the Left we have the well known Noxema cleanser, I used this for years when I was younger because it is mild and kept my skin clear. You can find this at just about any grocery store, drug store, snack shack and lemonade stand for about $3.99 (Wal-greens)
On the Right is my most FAVORITE cleanser that I have EVER used! Dermalogica's Special Cleansing Gel, and boy is it SPECIAL!! I began using in while in school (Esthetician school) and have never gone astray. It is more expensive but it lasts a VERY LONG TIME and it keeps my skin feeling and looking great! It runs about $30.00 and can be found in many fine salons and at Ulta.
Next up Moisturizer:
(let me say first that I also suggest using a toner but as I only have one that I like, I felt it wouldn't be fare, if you must know it is also a Dermalogica product)


On the Left we have Active Moist by Dermalogica. I realize that I have mentioned them several times, but their product is fantastic, and I stick to what I like. OK, well, Active Moist is a light moisturizer, perfect under makeup! It has a small amount of SPF in it but they don't list it, if memory serves me right it is SPF8 so you will get a little protection. It is not greasy or heavy but it gives great moisture to that middle of the road type skin. Found in "fine" salons, I like saying that, and in Ulta (about 37.00 for 1.7 oz)
On the Right we have Olay Complete, I love this moisturizer, in fact I have been using it for the last several months since my Active Moist ran out. It has sun (spf15) protection, is very light and non-greasy and inexpensive (about 7.49 for 4oz bottle). It is a great option for someone on a budget, which I think many of us are, yes?
Make up is next, (tip: you will always get better results with makeup when paired with well moisturized skin.)


On the Left is Bare Minerals makeup. I began using this years ago when the infomercials ran on late night television. Now you can find it in many "fine" retailers such as, Ulta, Sephora, and Nordstrom. It runs about $20 for one container (.42 oz). This a great product because is has SPF, it's light and hypo allergenic.
On the right is Physicians Formula Mineral Wear, I discovered this little number a year ago when money was tight and I didn't feel justified in spending on my makeup. I found it at Target for $12.69 (.49 oz) and I used a coupon for 2 dollars off. It has lasted nearly 8 months and I still have about half of it left. I will say that the coverage with this product is not as much as with Bare Minerals and I don't like the brush it came with so I use my Bare Minerals brushes to apply it. It is still a great product that I would totally recommend.
(tip: to keep your make up from forming bacteria, and to keep your skin clear, make sure to WASH your brushes every 10 days or so, use a mild soap and warm water and then lay out to air dry)
Next are some of the finishing products that I have come to LOVE and NEVER LIVE WITHOUT!!


The LashBlast Fusion Mascara ($7.29 at Target) is a new favorite! Covergirl recently came out with this new mascara and since I had been using the Original LashBlast for quite awhile and loved it I figured I would give it a try. It doesn't flake and makes my lashes thick, long and luxurious ;)
Another new product from Covergirl is the LiquilineBlast eyeliner ($7.49 on Amazon), I LOVE LOVE LOVE this eyeliner! I have tried MANY different brands and types and this one is by far the BEST, it glides on smoothly not pulling the skin and it gives the look of liquid eyeliner without the mess (plus, I don't know about you but I am the biggest DORK trying to apply liquid eyeliner)! The bonus is that it also has a blending tip on the other end which works like a charm!
The blushes and Eye shadows are all Avon, in fact they make several of my most used products. I LOVE their shadows and blushes, the above are just a few that I have tried. Avon is priced well and easy to come by since their are online stores, kiosks, and Avon representatives located in every city, town and bush!
Tip: For the sake of the thin skin around your eyes, and to help hold of those crows feat, having a gentle yet effective eye makeup remover is VERY IMPORTANT. I love this one by Avon ($1.99 on sale or $3.99 regular price)

Well I hope you have enjoyed this list of my favorite beauty products! If you have favorites I would love to hear what they are, I am always up for a new one to try!!

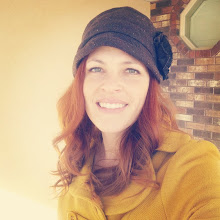
I mean seriously is this the face of a Covergirl or what!???? If these products can do this for me, just imagine what they can do for you!!! :)
PLUS A BONUS: A GIVE AWAY !!! The WINNER receives a tube of my FAVORITE MASCARA and a little extra surprise!!!!
All my love